
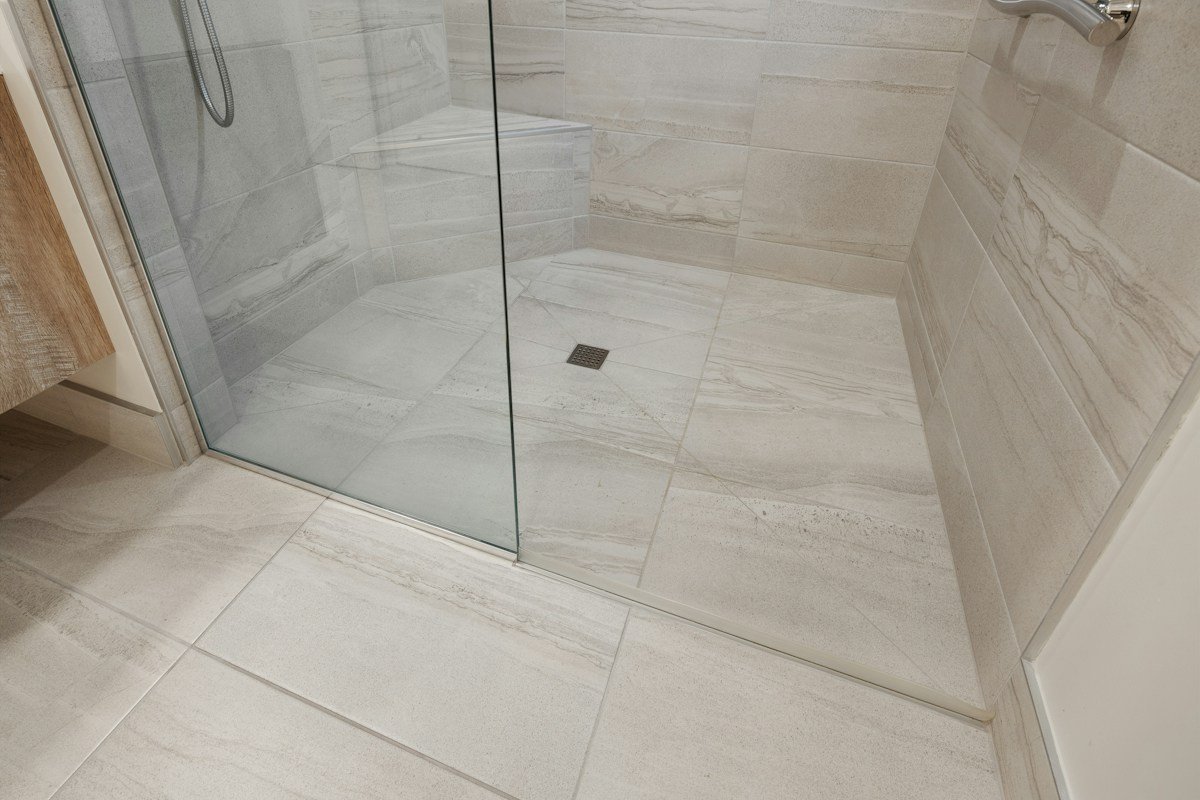
Designing a contemporary master bathroom shower demands a sophisticated synthesis of structural geometry, advanced materials engineering, and artistic vision. The walk-in shower serves as the visual centerpiece and experiential anchor of modern residential sanctuaries. When conceptualizing tile layouts, architects and interior designers look beyond mere surface ornamentation; they manipulate tile dimensions, orientation patterns, joint thicknesses, and surface textures to sculpt the perceived volume of the room. A masterfully executed tile layout establishes a serene cadence that guides the eye, highlights bespoke architectural niches, and turns a daily hygiene ritual into a revitalizing spa experience.
Modern master bathrooms have largely abandoned ornamental trim pieces, heavy listello accent borders, and busy multicolored mosaics in favor of clean, architectural surfaces. Today’s design movements emphasize continuous visual planes, rectified edges, monolithic slab aesthetics, and subtle textural contrast. By combining large-format porcelain panels on primary shower walls with tactile, slip-resistant mosaic geometries across the floor plane, designers achieve a harmonious equilibrium between sleek minimalism and grounded comfort. Every grout joint is calculated to align with niche sills, plumbing trim plates, and shower bench transitions, eliminating awkward fractional tile slivers and messy wall edges.
Beyond visual elegance, shower tile installations represent one of the most mechanically demanding environments in residential construction. The continuous exposure to hot water streams, high humidity, mineral deposits, and thermal expansion cycles requires uncompromising substrate preparation and waterproofing rigor. Adhering to technical installation guidelines codified by the Tile Council of North America and material standards established by the American Society for Testing and Materials guarantees that high-end tile compositions retain their structural integrity and water impermeability for decades. This master guide delivers an exhaustive architectural exploration of contemporary walk-in shower tile designs, layout geometries, material assemblies, and precision craftsmanship.
Over the following technical modules, we will examine the spatial physics and aesthetic applications of premier tile layouts. From monolithic large-format porcelain slabs and contemporary vertical stacked bonds to classic herringbone feature walls and curbless floor transitions, each design approach is analyzed with exact dimensions, substrate requirements, and grout parameters. Whether you are collaborating with a general contractor on a custom new build or planning a master suite renovation, these principles will help you create a breathtaking walk-in shower that stands as a testament to modern design excellence.
Monolithic Large-Format Porcelain Slabs: The Seamless Minimalist Frontier
The contemporary master bathroom design movement is defined by the rise of large-format porcelain tiles and ultra-thin sintered stone panels. Ranging from expansive thirty-two by sixty-four inches up to staggering five by ten-foot continuous porcelain slabs, these materials recreate the majestic beauty of Calacatta marble, Belgian bluestone, and travertine without the porous vulnerability or maintenance burdens of natural quarry stone. In walk-in shower architecture, large-format panels create a monolithic, continuous stone envelope that makes the shower feel remarkably calm and expansive.
The primary architectural benefit of monolithic porcelain slabs lies in the dramatic reduction of grout joints. Traditional four-by-four-inch or subway tile installations introduce hundreds of intersecting grout lines that fragment the wall surface and require persistent scrubbing to ward off mildew and soap scum. In contrast, a twelve-foot shower wall clad in three continuous large-format panels features just two ultra-fine hairline joints. When combined with color-matched polymer-modified or epoxy grout, these seams become practically imperceptible, creating an uninterrupted stone vista that reflects ambient light evenly across the shower enclosure.
Installing large-format porcelain panels requires meticulous substrate flatness and specialized handling tools. Standard wall framing tolerances often exhibit minor stud deflections that cause unacceptable lippage between large tiles. Tile installers must verify that the underlying backer board assembly adheres to TCNA standards, allowing no more than one-eighth-inch variance over ten feet. Heavy-duty vacuum suction cups, rigid aluminum carrying rails, and premium diamond blade bridge saws are mandatory to transport and cut these massive panels without chipping brittle edges or inducing structural micro-fractures.
Mortar selection and coverage percentages are equally critical when working with large porcelain slabs. Installers must employ high-performance, polymer-modified thin-set mortars classified under ANSI A118.15 standards, utilizing large half-inch square-notched or slant-notched trowels. Back-buttering the reverse side of every slab with a flat coat of mortar ensures minimum ninety-five percent continuous bond coverage, preventing hollow voids behind the tile that could crack under the impact of drill bits when mounting heavy frameless glass hinges or plumbing valves.
Vertical Stacked Bond: Elongating Height with Modern Architectural Rhythm
While the traditional horizontal brick running bond has dominated subway tile installations for decades, modern architectural sensibilities favor the crisp, contemporary alignment of the vertical stacked bond. In this layout, rectangular ceramic or porcelain tiles (typically measuring two by eight inches, three by twelve inches, or four by sixteen inches) are aligned in strict vertical and horizontal grids without any offset or overlap. The resulting design creates clean, unbroken vertical channels that guide the human gaze straight up to the ceiling plane.
The vertical stacked bond is particularly effective in master bathrooms with standard eight-foot or nine-foot ceiling heights. By creating strong vertical lines that run from the shower pan to the ceiling drywall, the pattern counteracts feelings of horizontal compression, making the entire bathroom feel taller and more open. When paired with tall frameless glass panels, the vertical cadence adds visual structure without the visual noise of traditional staggered patterns.
Precision layout planning is essential for a successful vertical stacked installation. Because every vertical and horizontal joint aligns in an unyielding crosshair grid, even minor irregularities in tile sizing or installer alignment become immediately noticeable. Using rectified tiles, which have been machine-cut to exact ninety-degree right angles and uniform millimeter dimensions, is crucial. Installers must establish a laser-leveled center vertical plumb line on the primary feature wall, balancing tile widths symmetrically into adjacent corners to avoid awkward, narrow slivers along edges.
The choice of grout contrast dramatically influences the mood of a vertical stacked shower. A high-contrast pairing, such as matte black grout against crisp white handmade ceramic tiles, produces a bold graphic statement reminiscent of Mid-Century Scandinavian architecture. Conversely, selecting a soft tonal grout that matches the glaze color creates a subtle, textural surface where the rhythmic grid is felt through gentle shadow relief rather than stark graphic contrast, providing an ideal backdrop for brushed brass shower fixtures.
Herringbone Accent Walls: Textural Depth and Tailored Elegance
For homeowners seeking tailored elegance and movement within a contemporary master shower, the herringbone pattern offers a timeless choice. Formed by laying rectangular tiles at precise forty-five or ninety-degree angles to create interlocking V-shaped chevrons, the herringbone layout injects energy, artisan craftsmanship, and dynamic visual movement into what could otherwise be a flat wall surface.
In contemporary master bathrooms, the herringbone pattern is most successfully deployed as a deliberate focal accent rather than an overwhelming whole-room treatment. Designing a dedicated herringbone feature wall directly behind the primary shower fixture column or inside an expansive recessed niche creates a dramatic architectural statement. Cladding the remaining side walls in serene, large-format neutral porcelain prevents sensory overload and allows the herringbone craftsmanship to stand out as a bespoke work of art.
Selecting the appropriate tile proportions for a herringbone installation dictates the optical weight of the wall. Slender, elongated ceramic tiles measuring two by ten inches or three by twelve inches produce a refined, tailored chevron pattern that feels sophisticated and modern. In contrast, wider two-by-four-inch tiles create a denser, busier visual weave better suited to vintage cottage baths. Utilizing tiles with subtle tonal variations or handmade zellige glazes adds organic ripples that catch both natural skylight rays and artificial downlighting beautifully.
Executing a herringbone layout requires advanced layout calculations and additional material orders. Due to the forty-five-degree diagonal angle cuts required at all floor perimeters, vertical corners, and niche margins, tile waste typically increases from standard ten percent up to fifteen or twenty percent. Master tile artisans establish a dead-center plumb line and lay dry layout grids before spreading mortar, ensuring that the chevron points are perfectly centered along the vertical axis of the wall, framing the shower valve trim plates with pinpoint symmetry.
Horizontal Stacked Bond and Fluted Ceramic Tile Formations
The horizontal stacked bond represents the counterpart to the vertical alignment, offering a grounded, horizontal layout that emphasizes width and spaciousness. In this configuration, rectangular tiles are stacked directly on top of one another in neat rows, creating continuous horizontal lines. In narrow walk-in showers or compact en-suite baths, horizontal stacked tiles draw the gaze across the width of the enclosure, creating an optical illusion of greater lateral depth.
A major trend in modern master showers is the incorporation of fluted, ribbed, and three-dimensional textured ceramic wall tiles within a horizontal or vertical stacked arrangement. These architectural relief tiles feature dimensional concave flutes, pillowed ridges, or geometric crests that transform shower walls into tactile works of art. As directional water droplets flow across the contoured ceramic ridges, they catch ambient light, adding mesmerizing shimmer and sensory depth to morning showers.
Integrating fluted ceramic tiles requires careful coordination around plumbing trim plates and frameless glass clamp locations. Because the surface face of fluted tiles is dimensional rather than planar, mounting flat escutcheon plates or glass hardware directly onto ribbed ridges can leave gaps that compromise water sealing. Experienced tile setters solve this by framing three-dimensional fluted sections inside flat, smooth porcelain borders or building flat tile collars around valve rough-ins to ensure watertight gasket seals.
Lighting plays an essential role in bringing stacked and fluted tile installations to life. Installing grazing ceiling spotlights or recessed LED perimeter light channels five to eight inches off the wall casts narrow beams down the tile face. This skimming light accentuates the dimensional peaks and valleys of fluted profiles, creating dramatic shadow interplay that highlights the wall’s texture and elevation.
Terrazzo Formats and Bold Mineral aggregate Compositions
Terrazzo has experienced an extraordinary renaissance in modern luxury residential design. Originally developed by Venetian mosaic artisans who embedded marble chips into clay mortars, modern engineered terrazzo utilizes high-strength Portland cement or bio-based resin matrices mixed with chips of quartz, granite, marble, and recycled glass. In contemporary walk-in showers, terrazzo delivers an energetic, artisanal texture that bridges mid-century modern design with European minimalism.
Specifying terrazzo for walk-in showers requires choosing between factory-rectified terrazzo tiles and large pre-cast engineered terrazzo slabs. Factory-produced cementitious terrazzo tiles measuring sixteen by sixteen or twenty-four by twenty-four inches offer dependable slip resistance, exceptional structural density, and modular installation flexibility. The randomized distribution of mineral chips creates a forgiving, organic pattern that conceals stray water droplets and soap film far better than solid, monochromatic high-gloss surfaces.
Material sealing protocols for terrazzo demand rigorous attention. Unlike vitrified porcelain, cement-based terrazzo contains microscopic pores that absorb water, body oils, and acidic grooming washes if left unsealed. Prior to grouting and again following final cure cycles, the terrazzo must be treated with an advanced, breathable penetrating silane-siloxane or fluoropolymer sealer certified by the U.S. Green Building Council for indoor air quality and environmental safety. Penetrating impregnators fill subsurface microscopic voids without leaving plasticized surface films that could alter slip resistance.
Color coordination with terrazzo allows for playful yet refined design schemes. A warm white terrazzo matrix flecked with cognac, sage, and charcoal marble chips can anchor the entire master bathroom palette. Designers often pull an accent hue directly from one of the mineral chips, matching it to matte lacquered floating vanity drawers, fluted glass partition framing, or bespoke unlacquered brass tapware to create a harmonious, unified interior.
Curbless Floor Transitions: Linear Drains and Continuous Ground Planes
The ultimate hallmark of luxury walk-in shower design is the zero-threshold curbless shower floor. By removing the traditional four-inch step-over curb, the bathroom floor flows seamlessly into the shower basin, creating a continuous plane that unites the room into one cohesive, barrier-free spa retreat. In addition to clean, modern aesthetics, curbless transitions offer universal accessibility, allowing homeowners to comfortably age in place without sacrificing architectural beauty.
The engineering key to a curbless shower floor is the installation of a linear trench drain. Traditional center shower drains require a multi-slope pan where the floor slopes inward from all four corners, demanding small mosaic tiles to accommodate the complex compound curves. In contrast, a linear drain stretches across the entire rear wall or shower entrance, allowing the floor to slope along a single, flat plane at a uniform one-quarter-inch drop per foot toward the drainage channel. This single-plane pitch enables the use of the same large-format floor tiles inside the shower as the rest of the bathroom.
Recessing the subfloor framing is necessary to accommodate a zero-threshold shower assembly. In wood-frame residential construction, carpenters sister support joists, install recessed subfloor pans, or utilize pre-engineered structural EPS foam trays that sit flush with adjacent subfloor sheeting. Liquid-applied waterproofing membranes or bonded polyethylene fabric sheets must extend across the entire shower basin, over the entrance threshold, and at least six feet into the dry bathroom floor to guard against capillary water migration.
Grate selection for linear drains should complement the tile aesthetic. Modern linear drain systems offer tile-in grates, where a slice of the primary floor tile is set directly into the drain cover channel. This leaves only a narrow five-sixteenths-inch perimeter reveal for water drainage, making the drain practically invisible and allowing the continuous beauty of the floor tile to take center stage.
Shower Niches and Floating Bench Integration: Architectural Cohesion
Storage niches and built-in benches should never feel like arbitrary afterthoughts; they must be designed as integral components of the shower tile architecture. An uncoordinated shower niche with mismatched tile trim can disrupt an otherwise pristine layout. In contrast, a thoughtfully planned niche aligns with tile grout joints, complements the room’s proportions, and provides practical storage for grooming essentials.
Niche placement must align with the tile grid. Before cutting into backer board substrates, installers establish the horizontal tile layout lines. The top sill and bottom ledge of the niche should align with horizontal grout joints, avoiding thin, awkward tile strips above or below the opening. For an ultra-clean contemporary look, line the interior niche walls with solid quartz or marble slabs matching the bathroom vanity countertop, with mitered pencil-edge joints that eliminate plastic or metal edge trims.
Illuminated niche architecture elevates evening showers into atmospheric rituals. Installing a low-voltage, waterproof IP67-rated LED micro-strip light beneath the upper lip of a horizontal niche casts a soft downward glow over artisanal shampoo bottles and natural sponges. Choosing a diffuse silicone channel with a warm 2700K color temperature ensures smooth, hotspot-free illumination that highlights tile textures while resisting daily steam exposure.
Shower benches provide practical utility, relaxation, and safety within large master walk-in enclosures. Cantilevered floating benches clad in solid quartz or porcelain panels project sixteen to eighteen inches from the wall, supported by concealed heavy-duty steel structural brackets bolted directly to wall framing. Floating benches preserve visible floor area underneath, making the shower feel larger and easier to clean than solid, floor-mounted bench masses.
Grout Selection Science: Epoxy vs High-Performance Polymer-Modified Grout
Grout is the connective tissue of any tile installation, providing structural cushioning between tile edges while acting as a barrier against water and dirt. The choice of grout chemistry and joint width directly influences the longevity, hygiene, and daily maintenance requirements of a modern walk-in shower. In high-traffic master showers, settling for standard cementitious grout often leads to stained, cracked joints that absorb moisture over time.
Epoxy grout represents the gold standard for shower durability and stain resistance. Composed of two-part epoxy resins, silica fillers, and color pigments, epoxy grout cures through chemical reaction rather than water evaporation. Once cured, epoxy grout forms an impermeable, glass-like bond with zero porosity, eliminating the need for periodic sealing. It is completely impervious to water penetration, mildew growth, acidic soaps, and body oils, making it the premier choice for busy master showers and white grout lines.
High-performance polymer-modified cementitious grouts (formulated to ANSI A118.7 standards) offer an excellent alternative that combines ease of installation with robust protection. These advanced formulas incorporate specialized dry polymers and hydrophobic additives that reduce water absorption, enhance flexural strength, and prevent efflorescence. While polymer-modified grouts require periodic application of penetrating sealers every two to three years, they handle wide joint variations gracefully and clean up easily during installation.
Grout joint width must be chosen to complement tile tolerances. Rectified porcelain tiles installed with precision leveling spacers allow for crisp, ultra-narrow grout joints measuring one-sixteenth to one-eighth inch. Narrow grout lines enhance the monolithic appearance of the shower and minimize joint surface area where residue can collect. For non-rectified handmade tiles or natural zellige formats, slightly wider joints (three-sixteenths inch) accommodate natural variations in tile edges, celebrating the bespoke craftsmanship of the artisan tile.
Lighting Interaction: Grazing, Recessed Fixtures, and Reflective Refractions
The true beauty of a walk-in shower tile layout is unlocked through thoughtful illumination design. Without intentional lighting, high-end porcelain textures, handmade glazes, and intricate mosaic details can look flat and dull. A modern lighting scheme highlights tile relief, illuminates grooming niches, and creates a tranquil atmosphere within the shower.
Wall-grazing downlighting is a powerful technique for accentuating textured and three-dimensional tiles. Installing wet-rated micro-aperture recessed pot lights six to eight inches off the feature wall casts light down the surface at a narrow angle. This grazing illumination highlights the subtle undulations of handmade ceramic tiles, the geometric ridges of fluted panels, and the crystalline veins of natural stone, producing rich visual depth.
Recessed ceiling cove lighting offers another sophisticated option for master walk-in showers. By integrating a concealed LED channel along the perimeter where the shower ceiling meets the back wall, designers create a soft, continuous wash of ambient light that floats the ceiling plane. All LED fixtures installed inside the shower wet envelope must carry certified wet-location ratings, run on Class 2 low-voltage twenty-four-volt drivers, and feature silicone-encapsulated enclosures to withstand hot steam.
Color temperature consistency across all bathroom light sources is vital. Mixing 2700K warm vanity sconces with 4000K cool shower downlights creates jarring chromatic clashes that distort tile hues and make stone appear sickly. Maintaining a unified color temperature (such as 3000K soft white) with a Color Rendering Index of ninety or higher ensures that marble veining, tile glazes, and human skin tones appear natural and vibrant throughout the master suite.
Subfloor Deflection Standards and Structural Joist Reinforcement for Heavy Tile Slabs
Behind every flawless master shower tile installation lies an unyielding structural subfloor engineered to resist microscopic deflections. When installing heavy rectified porcelain, natural marble slabs, or dense concrete terrazzo, the underlying timber framing must satisfy strict structural rigidity metrics. Tile and grout are inherently brittle materials possessing high compressive strength but virtually zero tensile elasticity. If the floor joist system flexes under the live weight of bathers or water volume, that deflection translates directly into shearing forces that crack grout lines, delaminate tile bonds, and rupture waterproof membranes.
The Tile Council of North America establishes rigorous structural deflection criteria for residential tile assemblies. For standard ceramic installations, the floor joists must meet an L/360 deflection standard, meaning that the maximum allowable deflection across the span cannot exceed the length of the span divided by 360. However, when specifying natural stone slabs or large-format porcelain panels exceeding twenty-four inches, the requirement doubles to an L/720 standard. Achieving this extraordinary stiffness in existing residential homes frequently requires contractors to sister additional two-by-ten framing lumber to existing joists or install structural blocking bridging between members to eliminate bounce.
Subfloor sheeting specifications must match this structural baseline. A single layer of half-inch plywood or oriented strand board is utterly insufficient to support a curbless walk-in shower. Installers must lay a minimum foundation of five-eighths-inch or three-quarter-inch tongue-and-groove exterior-grade subfloor plywood, fastened with structural adhesive and ring-shank screws every six inches. A secondary layer of certified cementitious backer board or an engineered dimpled polyethylene uncoupling membrane is then bonded to the subfloor with modified thin-set mortar. The uncoupling membrane allows the wood subfloor and the tile layer to expand and contract independently during seasonal humidity shifts, neutralizing shear stresses before they ever reach the finished tile.
Thermal Dynamics and Radiant In-Shower Floor Heating Integration
One of the ultimate sensory luxuries in a modern master bathroom is stepping onto a warm, radiant heated shower floor. While traditional tile floors feel uncomfortably cold to bare feet during winter mornings, integrating an electric radiant floor heating system turns the entire walk-in shower into an inviting, warm retreat. Beyond physiological comfort, in-shower radiant heat actively accelerates floor drying cycles, evaporating standing water droplets within minutes of shutting off the shower, thereby denying mold spores and mildew colonies the standing moisture they require to propagate.
Engineering electric radiant heating inside a wet shower enclosure requires specialized waterproof heating cables and strict code compliance. The heating cables must carry certified wet-location ratings and be installed directly over the uncoupling membrane or within the mortar screed bed, positioned underneath the final waterproofing sheet layer or encapsulated in approved waterproof polymer-modified self-leveling underlayment. Cables are spaced precisely three inches apart to deliver uniform thermal radiation without hot spots, producing a consistent floor surface temperature between eighty and eighty-five degrees Fahrenheit.
Temperature regulation requires dedicated dual-sensor smart thermostats installed outside the shower enclosure. The thermostat utilizes an ambient air sensor coupled with an in-floor thermistor probe embedded directly in the mortar bed between heating cables. This configuration allows homeowners to program automated heating schedules, warming the shower floor fifteen minutes before their morning alarm sounds. Connecting the radiant heating circuit to a dedicated Ground Fault Circuit Interrupter (GFCI) breaker rated at five milliamperes ensures absolute electrical safety in wet environments, delivering peace of mind alongside unparalleled spa comfort.
Threshold Transition Trims and Precision Mitered Edge Detailing
How tile terminations and ninety-degree outside corners are detailed separates amateur tile jobs from true architectural masterpieces. In past eras, tile manufacturers produced rounded bullnose trim pieces to cap raw tile edges. However, modern rectified porcelain tiles and stone slabs rarely feature matching factory bullnose components, requiring tile setters to execute crisp, contemporary edge treatments that align with modern architectural minimalism.
Architectural aluminum and stainless steel profile trims represent the most durable and visually streamlined solution for outside corners, shower niche frames, and curbless floor transitions. Sleek L-shaped profiles (such as Schluter-Jolly or Quadec) feature an integrated anchoring leg that beds firmly into the mortar layer behind the tile, presenting only a subtle, two-millimeter metallic reveal at the finished corner. Specifying anodized matte black, brushed champagne bronze, or brushed stainless finishes allows designers to coordinate edge trims directly with plumbing fixtures, creating a tailored, cohesive framing effect around shower doorways and shelving niches.
For purists seeking an immaculate stone look with zero visible metal trims, precision forty-five-degree mitered edges represent the pinnacle of artisanal craftsmanship. Using wet bridge saws equipped with continuous-rim diamond blades, tile artisans grind the back edge of adjacent tiles to an exact forty-five-degree angle, known as a birds-mouth miter. When joined together at outside corners, the tiles form a seamless ninety-degree intersection where the porcelain pattern appears to wrap continuously around the corner. The mitered seam is filled with color-matched two-part knife-grade epoxy resin, ground completely flush, and polished to a satin sheen, producing the illusion of a solid, carved block of stone.
Acoustic Decoupling and Sound Dampening in Shower Enclosures
Water roaring against tile walls and reverberating down plumbing supply pipes can create intrusive acoustic resonance that carries across bedroom walls and lower floors. In luxury contemporary master suites, controlling acoustic transmission within the walk-in shower is an essential facet of holistic architectural comfort. A peaceful bathroom should insulate the rest of the residence from early morning showering sounds, creating an acoustically tranquil retreat.
Sound isolation begins within the wall stud cavities surrounding the shower enclosure. Standard hollow partition walls act as acoustic amplifiers for running water and pipe vibrations. Packing the stud cavities with high-density mineral wool insulation provides substantial Sound Transmission Class (STC) improvements, absorbing airborne sound waves and deadening the acoustic roar of multi-jet shower systems. Plumbing supply lines must be fastened with cushioned neoprene isolator clamps rather than rigid copper brackets, preventing mechanical water hammer vibrations from transmitting into the wall framing.
Subfloor acoustic dampening complements wall insulation in multi-story residences. When installing curbless showers on upper levels, laying acoustic underlayment membranes beneath the uncoupling layer dramatically reduces impact sound transmission from footsteps and heavy water droplets striking the tile floor. By addressing both airborne and structure-borne sound pathways, the master bathroom retains a serene acoustic balance that matches its refined visual presence.
Comparative Diagnostic Matrix of Walk-In Shower Tile Materials
Selecting the right tile material for a master walk-in shower involves balancing aesthetic aspirations with practical requirements around maintenance, water absorption, and budget. Each material class possesses distinct physical properties, hardness ratings, chemical vulnerabilities, and installation demands that affect its performance in wet environments.
To assist homeowners and designers in selecting the optimal tile material for their walk-in shower, the following comparative matrix breaks down the four premier shower tile substrates across critical technical, durability, and maintenance metrics. Review these performance parameters carefully before making final tile and waterproofing commitments.
| Tile Material | Water Absorption Rate | Stain & Chemical Resistance | Maintenance Needs | Slip Resistance (DCOF) | Optimal Application Zone |
|---|---|---|---|---|---|
| Rectified Porcelain | Impervious (< 0.5%) | Exceptional (Resists All Chemicals) | Ultra-Low (No Sealing Needed) | High (> 0.42 in Matte/Textured) | Shower Walls, Ceilings & Floors |
| Natural Marble / Stone | Porous (0.5% – 3.0%) | Moderate (Prone to Acid Etching) | High (Annual Penetrating Sealers) | Moderate (Requires Honed Finish) | Feature Accent Walls & Niches |
| Handmade Glazed Ceramic | Semi-Vitreous (3.0% – 7.0% Body) | High (Glazed Face Impervious) | Low-Moderate (Gentle Cleaners) | Low (Unsuitable for Wet Floors) | Vertical Feature Walls Only |
| Engineered Terrazzo | Low-Medium (1.0% – 2.5%) | High (When Sealed with Resin) | Moderate (pH-Neutral Washers) | High (> 0.45 Matte Concrete) | Continuous Floor & Low Wainscots |
As this technical comparison highlights, rectified porcelain emerges as the premier all-around material for contemporary master showers, delivering near-zero water absorption, complete chemical resistance, and minimal maintenance. While natural marble and handmade ceramic offer unmatched organic beauty and artisanal depth, they require ongoing sealing maintenance and pH-neutral cleaners to preserve their finish. Balance your aesthetic vision with your long-term maintenance preferences before finalizing specifications.
Frequently Asked Questions About Walk-In Shower Tile Layouts
What is the most durable tile material for a walk-in shower?
Rectified porcelain tile is the most durable, reliable material for walk-in showers. Fired at temperatures exceeding two thousand degrees Fahrenheit, porcelain is an exceptionally dense, vitreous ceramic with a water absorption rate under 0.5 percent. It is virtually impervious to moisture penetration, scratching, soap scum staining, and chemical damage from harsh household cleaners, making it far superior to natural stone or standard ceramic in wet environments.
Can large format tiles be installed on a shower floor?
Yes, large format tiles can be installed on a shower floor if the shower is engineered with a single-plane slope toward a linear trench drain. Traditional center drains require a multi-slope pan that demands small mosaics to follow the compound curve. With a linear drain, the floor slopes in a single flat plane, allowing large-format tiles to run continuously from the main bathroom floor into the shower enclosure without awkward cuts.
What is the recommended slope for a walk-in shower floor?
The standard plumbing code recommendation for shower floor drainage is a minimum slope of one-quarter inch of vertical drop per one horizontal foot of run toward the drain. This slope ensures rapid water runoff and prevents pooling, while remaining gentle enough underfoot to provide a comfortable, safe standing surface during showers.
Is epoxy grout worth the extra cost over standard cement grout?
Yes, epoxy grout is well worth the investment for master walk-in showers. Unlike porous cementitious grout, epoxy cures into an impermeable, plastic-like resin that never requires sealing. It is completely stain-resistant, waterproof, and impervious to mold and mildew growth. Using epoxy grout in high-moisture showers prevents discoloration and eliminates hours of harsh scrubbing over the life of the bathroom.
How do I prevent slips in a walk-in shower with large tiles?
To prevent slips when using large tiles on a shower floor, choose tiles with a textured, matte, or honed finish that carry a certified Dynamic Coefficient of Friction rating of 0.42 or higher under wet test conditions. Alternatively, incorporating fine micro-grooves, bush-hammered stone textures, or perimeter mosaic drainage borders provides added tactile grip without compromising modern aesthetics.
Should shower wall tiles extend all the way to the ceiling?
Yes, running shower wall tiles all the way to the ceiling is strongly recommended in modern master bathrooms. Extending tile to the ceiling protects drywall from steam damage, eliminates awkward paint lines that divide the room, and visually elongates the space. Capping the tile installation with a crisp, silicone-sealed ceiling joint produces an immaculate, high-end architectural finish.
What is the best way to clean and maintain shower grout lines?
The most effective maintenance routine is wiping down glass and tiled walls with a silicone squeegee after each shower, followed by weekly cleanings using a pH-neutral cleaner and a soft microfiber cloth. Avoid acidic cleaners, bleach, or abrasive pads on natural stone and cementitious grout, as they break down sealers and pit tile glazes over time.
How should shower niches be waterproofed before tiling?
Shower niches must be sealed using a continuous, certified waterproofing membrane assembly. Installers can use pre-formed structural EPS foam niches or build custom framed niches lined with cement backer board, followed by two coats of liquid-applied waterproofing membrane or bonded sheet membrane over all seams, corners, and fastener heads. The bottom sill must be pitched with a subtle forward slope toward the shower drain to prevent standing water.
What is the ideal height for a shower niche?
The optimal height for a primary shower niche is between forty-eight and sixty inches above the finished shower floor. This range places body washes, shampoos, and razors within easy, ergonomic reach for standing adults while remaining well above the heavy splash zone of the shower pan.
Concluding Architecture for Enduring Master Bathroom Luxury
Creating an awe-inspiring walk-in shower tile design requires a balance of artistic sensitivity and engineering discipline. When properly executed, the shower transforms from a simple utility enclosure into an architectural sanctuary that elevates your daily routine and enhances your home’s long-term value. By carefully considering tile scale, joint alignment, linear drainage transitions, and precision waterproofing, you can craft a tranquil space that stands the test of time.
Begin your design process by defining your primary architectural goals: choose whether your space is best served by the seamless calm of monolithic porcelain slabs, the tailored elegance of herringbone feature walls, or the vertical rhythm of stacked bonds. Invest in unseen infrastructure by specifying robust waterproofing systems, high-performance epoxy grouts, and precision linear drain pans that ensure lasting moisture protection.
Ultimately, a master bathroom walk-in shower should be a harmonious retreat that brings calm and clarity to your daily life. By following the spatial principles, material insights, and layout strategies outlined in this guide, your remodeled shower will stand as a stunning example of modern residential craftsmanship and design integrity for years to come.