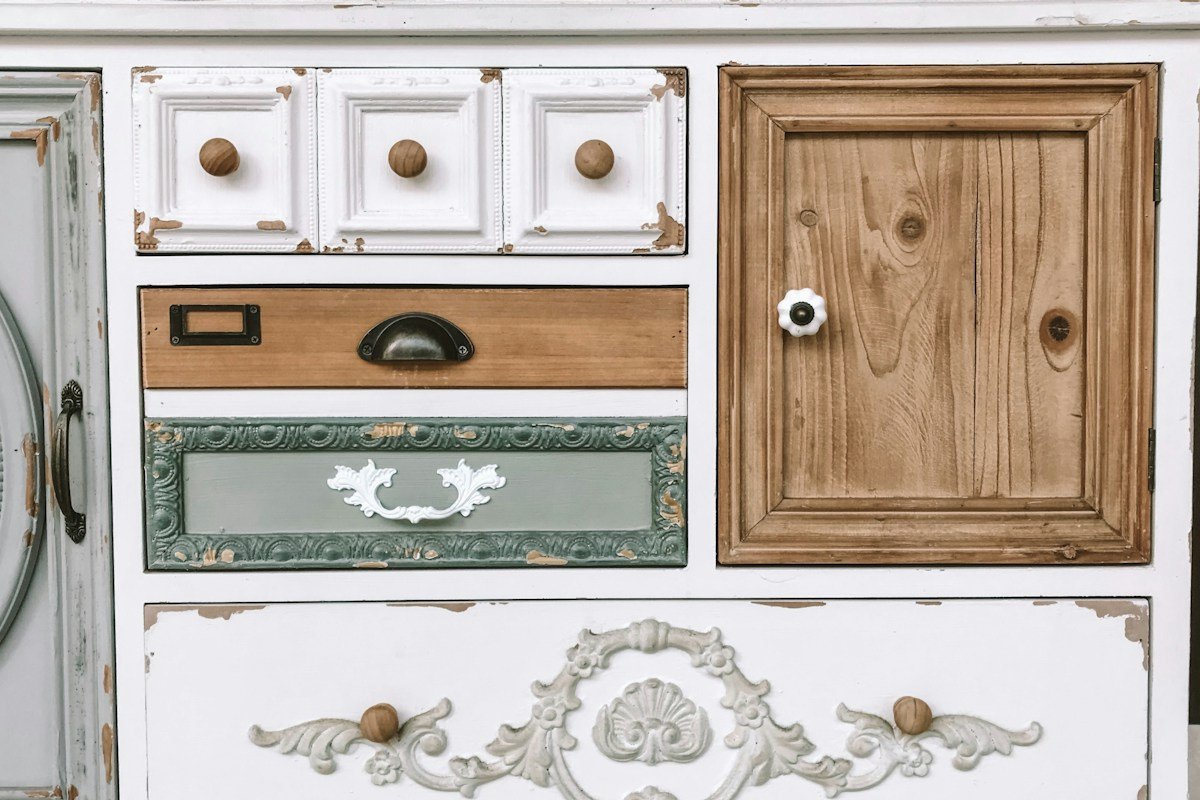
In an era dominated by flat-pack particle board and mass-produced synthetic furnishings that disintegrate within five years, thrift stores, estate sales, and antique barns represent treasure troves of genuine craftsmanship. Beneath decades of yellowed varnish, chipped orange shellac, and dated wood stains lie heirloom chests, serpentine dressers, and solid timber sideboards built with old-growth lumber, hand-cut dovetail joints, and mortise-and-tenon joinery. Upcycling these forgotten domestic relics through artisanal painting and historical distressing techniques bridges past heritage with modern residential sophistication.
Transforming a tired secondhand thrift find into a captivating focal point requires vastly more than slapping a coat of budget wall paint over dirty varnish. Amateur upcycling projects frequently result in peeling latex sheets, sticky gummy drawers, bleeding wood tannins, and garish sand marks that scream cheap DIY. True furniture revitalization is an art form rooted in organic chemistry, surface physics, and historic preservation techniques. By understanding how pigments, natural binders, and mineral bases interact with aged wood cellular structures, you create rich, layered patinas that appear to have evolved organically across a century of dignified domestic service.
Achieving authentic vintage charm demands a deep appreciation for material authenticity and mechanical safety. Grounding your restoration methodology in lead-safe renovation directives from the Environmental Protection Agency, professional coating specifications from the Master Painters Institute, museum conservation standards curated by the American Institute for Conservation, circular economy principles from the Sustainable Furnishings Council, and historical architectural surface guidelines from the National Park Service, this comprehensive manual delivers an authoritative roadmap for breathing soul, character, and longevity into secondhand timber furniture.
Throughout the comprehensive technical sections that follow, we unpack every phase of the furniture restoration journey. You will master structural diagnostic triage and joinery stabilization, lead paint testing protocols, deep chemical degreasing, shellac tannin barrier application, mineral versus milk paint chemistries, wet abrasion distressing choreography, dark wax burnishing, crackle medium timing, and hardware revitalization. Whether your aesthetic aligns with French provincial romanticism, rustic Swedish Gustavian simplicity, or weathered English farmhouse charm, this guide provides the exact blueprints to transform discarded relics into cherished heirloom centerpieces.
Anatomy of a Thrift Score: Assessing Joinery, Species, and Structural Integrity
The success of any furniture upcycling project is determined the moment you lay eyes on a piece at a thrift shop, flea market, or roadside curb. Learning to diagnose the anatomical construction of vintage furniture separates high-potential heirloom treasures from structurally hopeless, money-pit junk. Before spending your hard-earned dollars or hauling a heavy credenza home in your vehicle, you must conduct a thorough tactile inspection of its joints, carcass framing, and wood composition.
Dovetail joinery represents the premier hallmark of quality case construction. Pull out every drawer and inspect the front and rear corners. Look for English dovetail joints: interlocking wedge-shaped pins and tails that mechanically lock drawer sides to drawer fronts. Machine-cut dovetails from the early to mid-twentieth century feature perfectly uniform spacing, while nineteenth-century hand-cut dovetails exhibit charming variations in pin thickness and subtle pencil marks left by historical cabinetmakers. Avoid drawers held together with staples, butt joints, or plastic brackets; these pieces lack structural backbone and will rack out of square within months.
Distinguishing solid timber from wood veneers and engineered composite boards dictates your prep strategy. Inspect the top edges, sides, and back panel. Solid wood boards display continuous end-grain on their edges that corresponds with face-grain patterns. High-quality vintage veneer (frequently found on magnificent Art Deco or Victorian walnut and mahogany pieces) consists of a paper-thin slice of figured exotic wood glued over a secondary solid core (such as chestnut or poplar). If the veneer is bubbling, chipped, or lifting along edges, you must decide whether to re-glue the veneer using animal hide glue or peel damaged sections away down to the base lumber. Particle board or MDF, by contrast, feature sawdust cores and fake printed plastic contact paper: avoid these completely, as they swell irreversibly when exposed to water-based paints.
Structural racking tests reveal hidden framing failures. Place both hands firmly on the top of the dresser or console and apply moderate lateral and diagonal pressure. Does the carcass sway, creak, or wobble? Minor racking is easily repaired by disassembling loose joints, cleaning away old brittle animal glue with warm vinegar, and re-clamping with modern polyvinyl acetate (PVA) wood glue. However, severe diagonal racking caused by dry rot, termite damage, or fractured internal mortise-and-tenon rails indicates structural compromise that requires major woodworking reconstructive surgery.
Drawer slide mechanics require close operational scrutiny. Unlike modern cabinetry fitted with steel soft-close ball-bearing drawer runners, vintage furniture relies on traditional wooden drawer runners and center guide tracks. Check for deep grooves worn into the bottom of drawer sides or sagged center slides. Light friction is easily cured by rubbing paraffin wax or pure beeswax along wooden runners, but heavily gouged runners must be planed flat and patched with thin hardwood strips to ensure smooth, effortless operation.
Lead Safety Protocols and Decontamination Chemistry
When working with vintage furniture manufactured before 1978, personal safety and environmental decontamination must precede all sanding, stripping, or painting. Historical finishes: particularly vibrant white, cream, and pastel paints from the Victorian through mid-century eras: frequently contained high concentrations of lead carbonate and lead chromate pigments, added by early manufacturers for durability and opacity.
Inhaling microscopic lead dust generated by dry power sanding poses severe neurological and biological health hazards, particularly for young children and pregnant individuals. Before touching any pre-1978 painted finish with an abrasive pad, purchase an EPA-recognized sodium rhodizonate lead testing kit (such as 3M LeadCheck swabs). Cut a tiny diagonal notch through all paint layers down to the bare wood substrate, activate the testing swab according to package instructions, and rub the tip firmly against the cross-section. If the swab turns bright pink or red, lead is present, requiring strict containment protocols.
Containment procedures for lead-positive finishes dictate eliminating airborne dust generation entirely. Dry power sanding of lead-containing paint is strictly prohibited in residential spaces. Instead, utilize wet methods: either applying chemical paste strippers to liquefy the coating or employing wet sanding with waterproof silicon carbide abrasive papers lubricated with mineral spirits. Always conduct stripping operations outdoors or in an isolated workspace equipped with plastic floor containment sheeting, and wear an OSHA-compliant NIOSH-rated N100 or P100 respirator equipped with particulate filters.
Chemical stripper selection balances stripping efficacy against human toxicity. For decades, methylene chloride was the chemical solvent of choice for commercial furniture stripping due to its rapid paint-lifting action. However, methylene chloride has been banned from consumer retail sales by the EPA due to acute vapor toxicity and cardiovascular risks. Modern eco-friendly strippers utilize benzyl alcohol, dibasic esters, or citrus-derived terpene solvents (such as Citristrip or Dumond Smart Strip). These advanced formulations work more slowly but provide safe, pleasant-smelling stripping that clings to vertical carved details without drying out.
Proper waste disposal protocols protect municipal water systems and local soil. Scrapings, sludge, and contaminated paper towels resulting from paint removal must never be rinsed down household drains or thrown directly into open trash bins. Collect all hazardous sludge in heavy polyethylene disposal bags, allow volatile solvents to evaporate safely in well-ventilated outdoor areas, and consult your local municipal environmental waste authority for hazardous household waste drop-off procedures.
Surface Preparation: Degreasing, Mechanical Keying, and Tannin Blocking
Flawless paint adhesion and durable distressed finishes are achieved during the preparation phase. Skipping proper surface prep is the primary reason why amateur furniture paint jobs chip off in unsightly rubbery sheets. Decades of aerosol furniture polishes (which contain silicone oils), cooking grease, body sebum, and nicotine smoke form an invisible chemical barrier across vintage wood that repels paint emulsions.
Deep chemical degreasing represents the mandatory first step of surface prep. Never sand furniture before degreasing; sanding an oily, wax-coated surface drives microscopic silicone particles deep into the wood pores, creating permanent fish-eye craters in subsequent paint coats. Wash the entire piece thoroughly using a solution of Trisodium Phosphate (TSP) or an eco-friendly TSP substitute dissolved in hot water. Scrub crevices, carvings, and flat panels with a non-scratch abrasive pad, followed by wiping down twice with clean water-dampened microfiber cloths to remove all chemical residue. Allow the piece to air dry completely for twenty-four hours.
Mechanical keying (scuff sanding) creates microscopic physical tooth for paint bonding without stripping the existing finish to bare wood. You do not need to sand down to raw timber unless you plan to apply a transparent wood stain. Using a 150-grit to 180-grit aluminum oxide sanding sponge, lightly scuff all exterior surfaces following the direction of the wood grain. The objective is simply to de-gloss the shiny polyurethane or varnish topcoat, transforming the slick surface into a dull, receptive matte ground. Vacuum away all sanding dust using a soft horsehair brush attachment, followed by a thorough wipe with a tack cloth.
Tannin bleed-through is an insidious chemical phenomenon that ruins painted white and light-colored furniture. Red oak, cherry, cedar, and mahogany contain high concentrations of water-soluble tannic acids. When water-based paints (chalk paint, milk paint, or latex) are applied over raw or scuff-sanded mahogany, the water draws tannins up through the drying paint film, producing blotchy pink, orange, or yellow stains that bleed through endless coats of paint. Furthermore, old oil-based aniline furniture dyes from the 1920s through 1940s behave similarly, bleeding bright magenta through white finishes.
Sealing tannin bleed-through requires a dedicated shellac-based primer barrier. Water-based primers and standard oil primers will not block stubborn aniline dyes or intense wood tannins. The undisputed gold standard for sealing furniture bleed-through is dewaxed shellac (such as Zinsser B-I-N Shellac-Base Primer). Shellac is a natural resin secreted by the lac bug (Kerria lacca) dissolved in denatured alcohol. Because shellac contains zero water, it creates an impenetrable molecular seal that permanently locks tannins and dyes beneath the surface. Apply two light coats of shellac primer over high-risk wood species, allowing forty-five minutes of dry time between coats.
Paint Chemistries Compared: Milk Paint, Chalk Style, Mineral, and Waterborne Alkyd
The choice of paint chemistry dictates not only the final aesthetic appearance of your upcycled piece, but also how the paint responds to distressing techniques, how durable the finish will be under daily family use, and how it feels beneath your fingertips. Understanding the unique binder dynamics of each coating system ensures that you select the exact paint chemistry for your design vision.
Authentic milk paint represents the ultimate historical coating, utilized by cabinetmakers for hundreds of years. Sold as a dry powder containing milk casein protein, calcium hydroxide (slaked lime), and earth mineral pigments, authentic milk paint is mixed with warm water prior to application. Milk paint penetrates deeply into porous raw wood, creating an unbreakable, non-toxic bond that will never chip or peel. On pre-finished or slick surfaces, milk paint produces unpredictable, authentic chippy distressing: flaking off organically in random spots where the wood was slightly slick or oily, creating magnificent Gustavian or farmhouse patinas that cannot be duplicated with synthetic paints.
Chalk-style decorative paint has become the darling of modern furniture upcyclers due to its forgiving adhesion and velvet-matte finish. Formulated with calcium carbonate (chalk), talc, and acrylic latex emulsions, chalk paint boasts high porosity and an ultra-dead-flat sheen. Its chief advantage is exceptional adhesion over existing finishes with minimal sanding. Chalk paint dries rapidly, self-levels moderately well, and sands like butter, making it ideal for wet distressing and dry edge distressing. However, because chalk paint is highly porous, it requires a mandatory topcoat of furniture wax or polyacrylic to protect against grease, water, and staining.
All-in-one mineral paints (such as Fusion Mineral Paint or Silk All-in-One) incorporate modern polymer binders with 100% pure acrylic resin and natural mineral pigments. Unlike chalk paint, mineral paint cures into a non-porous, waterproof, scrubbable finish that requires zero wax or topcoat for standard domestic use. Mineral paints offer superior self-leveling, exceptional scratch resistance, and built-in UV protection. While mineral paint can be distressed using fine sandpaper, it must be distressed within four to six hours of application before the acrylic resin fully polymerizes and cures rock-hard.
Waterborne alkyd enamel represents the heavy-duty commercial standard for high-wear furniture pieces: such as dining table tops, kitchen barstools, and children’s study desks. Waterborne alkyds combine the clean water cleanup and low VOC emissions of latex paint with the self-leveling, durable enamel hardness of traditional oil-based paints. Alkyd enamels level out into a flawless, brushmark-free porcelain-like shell that resists chipping and yellowing over decades. While alkyds are not suited for soft, powdery distressing, they provide stunning, crisp satin backdrops for mid-century modern or transitional upcycled statements.
Precision Brushwork and Leveling: Eliminating Brush Strokes
Visible, ropy brush strokes instantly ruin the illusion of professional craftsmanship, revealing an amateur application. Achieving a silky, furniture-grade finish requires employing the proper brush anatomy, paint viscosity tuning, and disciplined application techniques.
Brush selection must be matched to paint chemistry. For water-based chalk, mineral, and latex paints, never use natural animal hair brushes (such as hog bristle); natural bristles absorb water from the paint, swelling up like wet mop strings and leaving deep, grooved stroke ridges. Specify premium synthetic brushes made from blended nylon and chiseled polyester filaments (such as Purdy XL, Wooster Silver Tip, or specialized oval chalk brushes like Staalmeester). Oval brushes hold an immense paint reservoir while providing precise, feather-soft tip release that smooths out paint films effortlessly.
Conditioning paint viscosity with specialized leveling extenders ensures a glass-like finish. Many chalk and acrylic furniture paints are packaged with high viscosity (heavy body) to maximize one-coat coverage. However, heavy-bodied paint dries too quickly on warm days, locking brush marks into the film before the paint has time to self-level. Adding five to ten percent distilled water or a professional acrylic flow improver (such as Floetrol) lowers surface tension, extending the wet open time and allowing surface ripples to melt into a flat, uniform plane.
Disciplined brush technique relies on the classic lay-off stroke. Never scrub the brush back and forth repeatedly across the wood surface. Charge the brush with a moderate amount of paint (dipping only the first one-third of the bristles), apply the paint across a two-foot section with smooth, flowing strokes, and immediately perform a light lay-off pass. Holding the brush at a low thirty-degree angle, glide the delicate tips gently from one edge across to the opposite boundary in a single uninterrupted motion, lifting smoothly at the end. Once the lay-off stroke is complete, walk away; touching paint that has begun to set up (after two or three minutes) will tear the curing skin and create permanent surface blemishes.
High-Volume Low-Pressure (HVLP) spray application provides the ultimate factory-smooth finish for intricate details. If upcycling a piece with extensive turned legs, French cabriole feet, or detailed rosettes, brushing can result in unsightly paint pooling in crevices. An entry-level HVLP turbine sprayer atomizes paint into an ultra-fine mist, laying down paper-thin, perfectly even coats that dry without a single trace of mechanical tooling.
Artisanal Distressing Methodologies: Wet Abrasion, Sanding, and Wax Resists
Distressing is the creative heart of vintage furniture upcycling. The goal of authentic distressing is not to make furniture look ruined or abused; rather, it is to simulate the poetic wear patterns created by decades of human hands touching drawer pulls, aprons, corners, and carved details. Understanding the geography of natural wear separates amateur sandpaper gouges from museum-grade historical patinas.
Mapping natural high-wear points requires studying how vintage furniture ages in real life. Where does paint wear away naturally over eighty years? It wears along the sharp exterior edges of drawer fronts, around the perimeter of brass hardware where knuckles graze the wood, along the bottom baseboard molding kicked by shoes, and across protruding carved floral scrolls. Paint never wears away in deep, recessed grooves or in the flat, protected center of a recessed panel. Sanding deep recesses looks artificial and breaks the vintage illusion.
Dry abrasion distressing utilizes flexible sanding blocks and micro-fine abrasives. Begin with a 220-grit aluminum oxide sanding pad or 320-grit wet/dry paper. Lightly rub the abrasive along the mapped exterior edges and corners, applying feather-light pressure. The objective is to gently expose the dark timber substrate or underlying primer layer in soft, graduated whispers rather than harsh, abrupt stop-lines. Step back frequently from a distance of six feet to evaluate the balance and symmetry of the wear patterns across the entire piece.
Wet distressing represents a dust-free, ultra-subtle alternative that delivers organic, blended edges. Because chalk-style and milk paints remain water-soluble until sealed with a durable topcoat, they can be gently rubbed away using moisture. Wrap a damp (not dripping) microfiber cloth around your index finger and rub gently along carved profiles and edges. The damp cloth softens and wipes away the top paint layer, leaving soft, feathered transitions that appear naturally worn by centuries of dusting cloths and soft apron hems. Wet distressing produces zero airborne dust, making it ideal for indoor apartment projects.
The wax resist methodology produces dramatic, multi-layered historical chippy finishes. If you desire a two-toned look: such as an antique French gray revealing glimpses of warm ochre or dark walnut beneath: apply your dark base coat and allow it to dry completely. Next, take a block of pure beeswax, a wax crayon, or a dab of hemp oil and rub it firmly along select edges, corners, and knots where you want paint to chip. Wipe away excess wax flakes and apply your lighter topcoat paint. Once dry, run a putty knife or fine sanding block lightly over the waxed zones: the paint directly over the wax will flake off cleanly, revealing the contrasting base color underneath in stunning, authentic chips.
Aging Patinas: Glazing, Dark Wax Burnishing, and Crackle Mediums
While distressing removes paint from high-contact points, antiquing glazes and dark waxes deposit rich, dark shadows into the low, protected crevices of the piece. This artistic interplay of light and shadow: highlighting raised details while deepening shadowy recesses: imparts three-dimensional depth and timeless soul to flat painted surfaces.
Dark furniture wax burnishing delivers an old-world European library sheen. Furniture waxes are manufactured from refined carnauba and beeswax blended with mineral spirits and dark umber or black pigments. Never apply dark wax directly onto raw chalk paint; the porous chalk paint will instantly absorb the dark pigment like a sponge, turning into an uncontrollable muddy smudge. Always apply a clear furniture wax coat first, buff it lightly, and then apply dark wax with a round wax brush. Work the dark wax deep into ornate carvings, fluted columns, and corner joints.
Buffing and blending the dark wax creates translucent tonal gradations. Using a clean lint-free cotton cloth or horsehair shoe buffing brush, wipe away excess dark wax from the high, flat surfaces, leaving rich dark wax trapped only in the deep grooves and shadow lines. If a section appears too dark, apply a dab of clear wax to your rag: the clear wax acts as an eraser, re-liquefying and lifting the dark pigment until you achieve the exact smoky patina desired. Allow the wax to cure for twenty-four hours, then buff briskly to produce a soft, silky satin luster that feels luxurious to the touch.
Liquid decorative antiquing glazes provide extended open time for expansive flat surfaces. Formulated from clear waterborne or oil-based glaze mediums tinted with burnt umber, raw sienna, or Van Dyke brown pigments, liquid glazes remain workable for twenty to thirty minutes. Brush the glaze across a painted door panel or drawer front, then use a dry badger hair blending brush or crumpled cheesecloth to pounce and soften the glaze. Dragging a dry brush vertically through the wet glaze produces subtle strié wood-grain textures that simulate aged linen or historic limewash finishes.
Crackle mediums recreate the distinctive spiderweb crazing seen on historic eighteenth-century painted artifacts. Applied between a contrasting base coat and topcoat, crackle medium contains specialized gum arabic or animal hide binders that shrink aggressively as they dry. When a water-based topcoat is brushed over the tacky crackle medium in a single, confident stroke, the medium pulls the wet paint apart, creating dramatic fissures, flakes, and weathered alligator textures within minutes.
Protective Sealing: Furniture Waxes, Hemp Oils, and Matte Polyacrylic Topcoats
All decorative paint and distressing artistry will quickly deteriorate without a durable protective topcoat. The choice of sealer must align with the functional demands of the furniture piece: a delicate decorative bedroom sconce requires vastly different mechanical protection than a busy kitchen dining table subject to hot coffee mugs and spilled spaghetti sauce.
Natural furniture waxes provide the authentic historical standard for low-contact accent pieces: such as decorative chests, mirror frames, and hallway consoles. Carnauba and beeswax formulas dry to a breathable, water-resistant sheen that repels light dust and enhances color depth. However, wax offers minimal heat or alcohol resistance: a hot mug placed on a waxed surface will leave a permanent white heat ring, while alcohol will dissolve the wax film. Furthermore, wax requires annual re-buffing and re-application to maintain its protective luster.
Pure cold-pressed hemp oil represents an organic, food-safe penetrating sealer favored for milk paint and raw timber tops. Extracted from industrial hemp seeds, hemp oil is a drying oil that absorbs deeply into wood cellular fibers, polymerizing over thirty days into an elastic, water-repellent barrier. Hemp oil intensifies paint color vibrancy, creating rich velvety saturation without adding synthetic plastic films. It is non-toxic, hypoallergenic, and can be easily reapplied with a rag whenever the wood begins to look dry or dull.
Water-based polyacrylic topcoats deliver maximum chemical and scratch durability for high-traffic residential surfaces. Unlike traditional oil-based polyurethanes: which cure with a pronounced yellow or amber cast that ruins crisp white and cool gray paint jobs: high-performance water-based polyacrylics (such as General Finishes High Performance Topcoat in Flat or Satin) dry crystal-clear without yellowing over time. Polyacrylic creates an impermeable acrylic-urethane shield that resists heat rings, water droplets, and household cleaners.
Application choreography for clear topcoats prevents foaming, bubbles, and streaking. Stir the topcoat gently with a flat wooden stir stick; never shake the can, as shaking introduces millions of microscopic air bubbles that become trapped in the drying film. Apply three thin coats using a high-density flat foam brush or synthetic finishing pad, working strictly in the direction of the wood grain. Allow two to three hours of dry time between coats, lightly hand-scuffing with a fine 400-grit abrasive pad between layers to slice off dust nibs and ensure pristine clarity.
Hardware Revitalization: Restoring Antique Brass and Re-boring Pull Holes
The hardware adornment of vintage furniture represents the jewelry of the piece. Discarding authentic antique brass, hand-forged iron, or cast bronze bail handles in favor of cheap modern zinc reproductions strips the furniture of its historical pedigree. Revitalizing original vintage hardware completes the upcycled transformation with authentic dignity.
Stripping decades of built-up paint from ornate brass hardware is surprisingly simple using the classic crockpot or stovetop simmering method. Place old painted drawer pulls, escutcheon plates, and hinges into an old thrifted slow cooker filled with hot water and two tablespoons of liquid dish soap or baking soda. Set the cooker on low heat and allow the hardware to simmer gently for four to six hours. The heat softens the old paint layers, causing the paint to expand and peel away from the metal. Remove the hardware with tongs and use a stiff nylon bristle brush to whisk away the softened paint effortlessly, revealing intricate cast metal detailing underneath.
Polishing versus preserving natural metal patina requires careful aesthetic discernment. If you prefer a gleaming golden shine, polish cleaned brass hardware using a non-abrasive metal polish (such as Brasso or Flitz) and a soft cotton flannel cloth. However, for authentic vintage charm, leaving the dark, rich oxidation trapped in recessed crevices while buffing only the raised highlights creates an exquisite aged antique brass patina that looks century-old.
Patching and re-boring hardware mounting holes allows installing modern decorative pulls when original hardware is missing. Vintage furniture frequently features non-standard screw hole center-to-center spacings (such as 2.75 inches or 3.25 inches) that do not align with modern commercial 3-inch, 4-inch, or 5-inch pull standards. To patch old holes cleanly, chamfer the hole edges lightly, tap in matching hardwood dowel pins coated in wood glue, allow to cure overnight, and saw the dowels flush with a flexible flush-cut pull saw. Sand flat, seal with shellac primer, and drill new mounting holes using a precision acrylic cabinet hardware drilling template.
Furniture Finish Systems Performance Comparison
Selecting the optimal paint and sealer combination requires balancing color richness, distressing ease, surface durability, chemical resistance, and ease of application. A nursery changing table requires non-toxic, scrubbable durability, whereas an antique French provincial armoire demands soft, chalky patinas and burnished wax shadows.
Evaluating each finishing chemistry against standardized workshop performance criteria ensures that your creative effort results in an enduring, functional piece of furniture that stands up to modern family life.
The comparative matrix below evaluates the certified durability, distressing compatibility, topcoat requirements, dry times, and ideal applications for the six primary furniture finish systems used by professional upcyclers today.
| Furniture Finish System | Surface Durability | Distressing Compatibility | Required Protective Topcoat | Cure Time to Hardness | Ideal Application Zone |
|---|---|---|---|---|---|
| Authentic Powdered Milk Paint | Very High (on raw wood) / Medium (chippy) | Exceptional (Natural chippy & flaking) | Hemp Oil or Natural Furniture Wax | 14 – 30 days (oil polymerization) | Primitive country pieces, rustic Swedish cabinets |
| Chalk-Style Decorative Paint | Low without sealer / Medium with wax | Effortless (Wet wipe & dry sand) | Mandatory: Clear Wax or Polyacrylic | 21 – 30 days (wax hardening) | Bedroom dressers, ornate mirrors, consoles |
| All-in-One Mineral Paint | High (Waterproof & stain resistant) | Moderate (Distress within 4 hours) | Optional (Self-sealing acrylic resin) | 21 days (pure acrylic cure) | Modern accent sideboards, nightstands, entry tables |
| Waterborne Alkyd Enamel | Very High (Scratch & scrub resistant) | Poor (Resists sanding once cured) | None required (Cures to enamel hardness) | 14 – 21 days (chemical cross-linking) | Dining table bases, kitchen chairs, desk frames |
| Antiquing Glaze over Satin Base | Medium to High (Depends on topcoat) | High (Artistic wipe-back shading) | Mandatory: Satin or Dead-Flat Polyacrylic | 7 – 14 days | French provincial carvings, fluted armoires |
| Clear Polyacrylic over Distressed Paint | Maximum (Resists heat, water & alcohol) | N/A (Applied after distressing is complete) | Is the topcoat itself (3 thin coats) | 7 – 10 days | Dining tabletops, coffee table decks, high-wear desks |
Reviewing these performance benchmarks allows you to select your finish system with complete confidence. By matching the binder mechanics to the physical demands of your furniture piece, you guarantee that your artistic distressing and rich patinas endure through generations of active household use.
Frequently Asked Questions About Painting Thrifted Furniture
Do I really need to sand thrifted furniture before using chalk paint?
While chalk paint marketing frequently claims zero sanding is necessary, professional upcyclers always perform a quick five-minute scuff sand with 150-grit or 180-grit paper. Scuff sanding de-glosses slick factory varnishes and breaks down old wax polishes, creating microscopic mechanical tooth that guarantees paint will never peel or scratch off down the road.
How do I stop red wood stains from bleeding through my white paint?
Red stains, mahogany tannins, and old aniline dyes cannot be blocked by standard water-based paints or latex primers. To permanently stop tannin bleed-through, apply two coats of a pure shellac-based primer (such as Zinsser B-I-N). The alcohol-based shellac creates an impenetrable molecular seal that prevents water-soluble tannins from migrating to the surface.
What is the difference between wet distressing and dry sandpaper distressing?
Dry distressing uses sandpaper or an abrasive sponge to scratch away paint from raised edges, producing crisp, sharply defined raw wood exposure. Wet distressing uses a damp microfiber cloth to gently rub and dissolve water-soluble chalk or milk paint, creating soft, feathered, natural-looking wear gradients with zero airborne dust.
Can I put a clear polyurethane topcoat over furniture wax?
No, you must never apply polyurethane, polyacrylic, or any other water- or oil-based finish over furniture wax. Wax acts as a permanent bond-breaker; topcoats applied over wax will fail to adhere, bubbling and peeling off in gummy sheets. If you decide to change from wax to polyacrylic, you must first dissolve and remove all wax using mineral spirits.
How do I clean thrift store furniture that smells like mildew or cigarette smoke?
First, wash the piece thoroughly inside and out with hot water and Trisodium Phosphate (TSP). Place the drawers outside in direct sunlight for a full day to allow ultraviolet light to neutralize odors. Finally, spray the unpainted interior drawer cavities and carcass frame with clear dewaxed shellac; shellac permanently locks in deep wood odors and smoke resins.
Why does my paint crackle or crack unexpectedly?
Unexpected crackling (alligatoring) occurs when a topcoat of paint dries faster than the undercoat beneath it, or when paint is applied over an incompatible glossy finish or uncured oil residue. Always allow each coat of primer and paint to dry thoroughly according to manufacturer guidelines, and ensure thorough chemical degreasing before painting.
What is the best way to get paint off vintage brass hardware?
Simmer the hardware in a slow cooker filled with hot water and two tablespoons of baking soda or liquid dish soap on low heat for four to six hours. The gentle heat expands the metal and softens the old paint, allowing it to slide off effortlessly with a soft nylon brush without scratching the fine metal detailing.
How long should I wait before placing heavy items on newly painted furniture?
There is a critical difference between dry time and cure time. While paint may feel dry to the touch in two hours, full chemical curing (polymer cross-linking) requires twenty-one to thirty days. Avoid placing heavy lamps, ceramic vases, or electronics on the surface during the first month, or place soft felt pads beneath objects to prevent indentations.
Can I paint over laminate or Ikea particle board furniture using these techniques?
Yes, but laminate requires a specialized bonding primer. Because laminate is plastic rather than wood, scuff sand the slick surface thoroughly with 120-grit paper to remove the shine, and apply a high-adhesion bonding primer (such as Zinsser Bulls Eye 1-2-3 or Stix Waterborne Bonding Primer) before applying your decorative paint.
How do I achieve an authentic French country chippy finish with milk paint?
Mix authentic powdered milk paint with warm water and apply it directly over a pre-finished wooden piece without using a bonding agent. In areas where you want dramatic chipping, rub a dab of hemp oil or a candle wax stick along the wood before painting. As the milk paint dries, it will organically flake and chip away over the slick and waxed spots, producing authentic historical charm.
Design Verdict and Sustainable Heirloom Craftsmanship
Transforming forgotten thrifted furniture through artisanal painting and historical distressing techniques is one of the most environmentally sustainable and aesthetically satisfying endeavors in modern interior design. By rescuing well-crafted vintage timber pieces from landfills, you preserve old-growth lumber, honor historical woodworking joinery, and enrich your home with authentic, one-of-a-kind character.
Approach every upcycling project with patience and chemical precision: evaluate drawer dovetails and structural racking, clean surfaces deeply with degreasing chemistry, seal troublesome tannins with shellac barriers, and select high-quality mineral or milk paints that respond gracefully to artisanal wear. Seal your creation with natural waxes or crystal-clear polyacrylics to ensure that your handiwork withstands decades of loving daily use.
Ultimately, a masterfully upcycled vintage piece is vastly more than a painted table or chest; it is a living bridge between generations: a soulful, tactile heirloom that anchors your living space with warmth, dignity, and enduring artistic charm.