Remodeling a compact bathroom presents one of the most rewarding architectural puzzles in modern residential interior design. When square footage is strictly constrained, every square inch of floor area, wall depth, and vertical clearance must perform double duty. Urban homeowners, apartment residents, and owners of vintage residences often confront tight secondary powder rooms or primary baths that feel cramped, dim, and cluttered. Achieving a luxurious, spa-inspired sanctuary within a modest footprint requires shifting from decorative band-aids to structural and spatial problem-solving. By prioritizing clean spatial sightlines, recessed storage cavities, continuous flooring planes, and layered illumination, any modest bathroom can be transformed into an expansive, highly comfortable oasis.
The secret to successful small bathroom remodeling lies in the delicate harmony between architectural ergonomics and optical depth. In conventional architectural planning, standard bathroom dimensions often allocate minimum clearances: thirty inches between sanitary fixtures, twenty-four inches of unobstructed walkway in front of the lavatory, and compact sixty-by-thirty-inch alcove bathtubs. However, when these basic baselines are combined with heavy, floor-mounted cabinetry and opaque shower curtains, the usable volume rapidly contracts visually and physically. Modern design approaches dismantle these sensory barriers by introducing uninterrupted ground planes, floating millwork, low-profile fixtures, and reflective glass expanses that allow the eye to travel freely from baseboard to ceiling.
Furthermore, contemporary homeowners must approach small bathroom renovations through the lens of longevity and environmental wellness. High-performance waterproofing systems, moisture-resistant drywall substrates, smart low-flow fixtures, and low-VOC mineral surface finishes ensure that the remodeled space maintains its pristine aesthetic resilience against daily humidity cycles. By referencing the residential guidelines established by the U.S. Department of Housing and Urban Development and spatial accessibility metrics outlined by the Americans with Disabilities Act, this comprehensive guide provides homeowners, interior renovators, and design connoisseurs with actionable blueprints to optimize compact bath layouts for peak comfort, elegance, and property value.
Throughout the following deep-dive exploration, we will dissect the foundational building blocks of micro-spatial bath renovation. From configuring curbless zero-threshold walk-in showers to engineering recessed medicine cabinets between wall studs, each thematic discipline is thoroughly mapped with actionable dimensions, material comparisons, and structural techniques. Whether you are executing a total down-to-the-studs overhaul or curating a high-impact fixture upgrade, these proven principles will guide your renovation journey from conceptual schematic drawings to immaculate physical execution.
Spatial Ergonomics and Foundational Layout Strategies for Compact Bathrooms
Before selecting tiles, plumbing finishes, or vanity quartz slabs, the physical layout must undergo rigorous spatial analysis. In compact bathrooms measuring forty to sixty square feet, fixture placement dictates human circulation, cabinet door swings, and mechanical routing. The golden standard of micro-spatial layouts involves organizing the primary wet plumbing fixtures along a single structural wall. This single-wet-wall configuration consolidates supply pipes, drain branches, and soil stacks within a singular stud cavity, significantly reducing structural framing compromises and labor expenses while maximizing open floor expanse on the opposing wall.
Fixture clearance standards, as codified by the National Kitchen and Bath Association, recommend at least twenty-one inches of clear walkway in front of toilets and sink basins, with thirty inches considered ideal for full ergonomic mobility. In narrow bathrooms measuring five feet wide by eight feet long, installing an elongated bowl toilet next to a deep vanity frequently obstructs walkway flow. Replacing a traditional elongated toilet with a compact-elongated floor model or a wall-hung carrier frame can recover three to six invaluable inches of circulation depth without sacrificing seating comfort. Wall-hung toilets house their reservoir tank inside a standard two-by-four or two-by-six framing cavity, leaving the floor underneath completely open and visible.
Door swing ergonomics play a pivotal role in compact bathroom functionality. Traditional inswinging doors demand approximately eight to ten square feet of dedicated clearance radius, frequently colliding with sink edges, towel bars, or linen closets. Transitioning from a standard hinged door to a heavy-duty pocket door sliding within the partition wall immediately recaptures this dormant floor area. If internal wall plumbing or wiring precludes a pocket cavity, an exterior sliding barn door or an outswinging hinge configuration provides an equally effective alternative. Eliminating door intrusion allows for wider vanity widths, comfortable drying zones, and an effortless entry experience.
Vertical spatial zoning represents another indispensable layout discipline. When horizontal footprint is finite, utilizing wall elevation from forty-eight inches upward expands functional volume. Suspending floating cabinetry, building floor-to-ceiling recessed pantry columns, and extending shower wall tile directly to the ceiling plane draws the human gaze upward, visually stretching ceiling height. By deliberately avoiding horizontal visual breaks such as dark chair rails or heavy partial-height wainscoting, the bathroom boundaries feel expansive, unified, and inherently restful.
Floating Wall-Hung Vanities: Elevating Floor Space and Visual Lightness
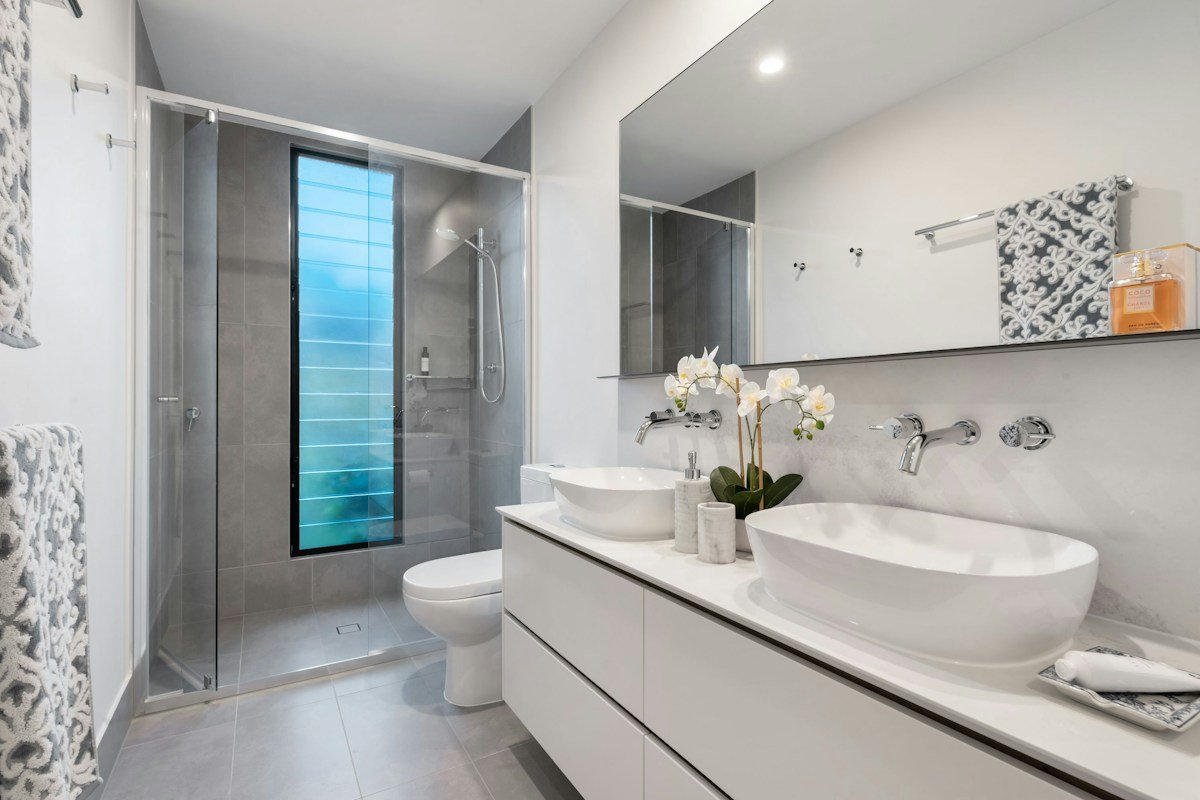
The bathroom vanity traditionally occupies the largest physical mass within the room. Bulky, traditional cabinetry with decorative plinths, baseboards, and deep solid drawers acts as a visual anchor, making tight rooms appear smaller and darker. In contrast, modern floating wall-hung vanities suspend the cabinetry twelve to eighteen inches above the finished floor, immediately altering the spatial perception of the interior. By extending the visible floor tile all the way to the back wall, the human eye interprets the floor plane as continuous, which intuitively registers the room as significantly more spacious.
Engineering a wall-hung vanity demands precise structural backing during the rough framing stage. Because cantilevered cabinetry supports not only its own dead load and heavy quartz or concrete countertops but also the live load of human leaning, contractors must secure two-by-six or two-by-eight solid wood blocking between the wall studs. Heavy-duty adjustable mounting brackets, bolted directly through the structural blocking, ensure long-term stability and eliminate sagging. Selecting an elevated clearance of ten to fourteen inches also creates dedicated clearance for integrated under-cabinet ambient LED strip lighting, which casts a soft downlight that accentuates floor tile textures and provides ideal night illumination.
Internal vanity organization must be ruthlessly optimized in compact models. While traditional vanities waste large interior volumes around bulky P-traps, modern small-space vanities feature specialized low-profile plumbing configurations. Utilizing a space-saving European-style concealed siphon or offset drain pipe allows for full-extension U-shaped pullout drawers with customized interior compartments. This setup accommodates grooming tools, electric toothbrushes, hair dryers, and cosmetics neatly without requiring clumsy plastic bins or countertop clutter. Integrated electrical outlets positioned directly within the lower drawers keep cords concealed and surfaces spotless.
Countertop material selection for floating vanities in small bathrooms requires balancing durability, stain resistance, and light reflectivity. Engineered quartz with a polished or honed finish in soft alabaster, warm calacatta, or light limestone tones reflects ambient light into shadows. Integrated single-piece solid surface sink basins eliminate silicone seam lines entirely, simplifying daily cleaning routines and creating an uninterrupted, minimalist visual horizon that complements the airy suspended aesthetic.
Curbless Walk-In Showers and Frameless Glass Enclosure Architecture
Eliminating the traditional acrylic tub-shower combo in favor of a modern curbless zero-threshold walk-in shower is arguably the single most transformative design decision for a small bathroom. Standard tub walls stand fourteen to eighteen inches tall, creating a solid physical and visual partition that cuts the bathroom floor area in half. In contrast, a curbless walk-in shower merges the shower floor seamlessly with the main bathroom floor, transforming two compartmentalized micro-zones into one expansive, unified architectural suite.
Achieving a zero-threshold curbless shower requires meticulous subfloor preparation and high-performance waterproofing assemblies. Contractors typically lower the subfloor framing joists or install pre-sloped structural foam shower pans that recess flush with the adjacent subfloor. Waterproofing membranes, such as bonded polyethylene sheets or liquid-applied elastomeric coatings tested to American National Standards Institute standards, must extend seamlessly across the entire floor and up the walls. Utilizing a linear trench drain positioned along the rear shower wall eliminates the need for a complex multi-slope floor pan, allowing for large-format floor tiles to run uninterrupted from the bathroom doorway straight to the back shower wall.
Frameless glass enclosures represent the ultimate optical companion to a curbless shower. Heavy metal frames, frosted glass panels, and fabric shower curtains introduce dense vertical obstructions that trap shadows and visually divide the room. By installing a fixed panel of three-eighths-inch or one-half-inch ultra-clear low-iron glass, light passes freely across the space. Low-iron glass eliminates the distinct greenish tint present in standard float glass, preserving the true color fidelity of custom tilework, natural stone accents, and wall finishes behind the partition.
Maintenance and splash management in compact walk-in showers require thoughtful geometric planning. A fixed glass partition measuring thirty-two to thirty-six inches in width is often sufficient to contain water droplets from a ceiling-mounted rainfall showerhead or a properly angled wall-mounted hand shower, leaving a comfortable open entry walk-in corridor without requiring an operable door. Treating both faces of the tempered glass with a factory-applied hydrophobic nano-coating repels mineral deposits, soap scum, and water spots, ensuring crystal-clear clarity with minimal wiping.
Recessed Storage Niches and Concealed Wall Stud Cavity Engineering
Storage is frequently the primary casualty in small bathroom renovations. When floor space is at a premium, building protruding storage cabinets, standalone etageres, or external wall-mounted shelves encroaches directly on human breathing room and elbow clearance. The master solution lies within the building architecture itself: tapping directly into the hollow wall cavities between standard two-by-four and two-by-six framing studs to create recessed storage niches that deliver voluminous storage with zero intrusion into the physical room.
Within the shower enclosure, a recessed shower niche serves as a dedicated home for shampoos, soaps, and botanical grooming essentials. Standard wood studs are placed sixteen inches on center, yielding fourteen and a half inches of clear width between vertical members. By installing horizontal structural headers, renovators can build multi-tier vertical shower niches measuring fourteen inches wide by thirty-six inches tall. To maximize aesthetic impact and durability, the interior niche surfaces should be lined with the same tile or solid stone slabs used on the adjacent walls, pitched with a subtle one-eighth-inch forward slope on the bottom sill to guarantee positive water drainage.
Beyond the wet shower area, recessed medicine cabinets offer exceptional utility. Modern recessed medicine cabinets abandon the dated ornamental frames of previous decades in favor of clean, frameless mirrored doors that mount flush with the drywall plane. Extending six inches into a two-by-six plumbing partition wall or four inches into a standard two-by-four wall, a full-height recessed medicine cabinet can accommodate prescription bottles, skincare serums, electric trimmers, and internal charging stations. Concealed soft-close hinges, magnetic interior organizers, and integrated LED backlighting elevate the cabinet from a mundane utility box to a bespoke vanity feature.
In water closet zones, the space directly behind the toilet represents prime recessed real estate. Constructing a vertical recessed pantry cabinet with glass or matching hardwood doors provides abundant storage for extra bath linens, toilet tissue rolls, and cleaning supplies. Because these storage units sit completely flush with the surrounding drywall, they do not disrupt circulation paths or cast harsh overhead shadows, preserving the sleek, tranquil geometry of the renovated interior.
Reflective Surfaces, Mirror Placement, and Optical Horizon Expansion
Mirrors and reflective architectural finishes are the quintessential tools for expanding optical horizons in interior architecture. In a small bathroom, a mirror does far more than provide a reflective surface for morning grooming; it functions as an artificial spatial window that duplicates the apparent volume of the room and bounces natural and artificial light into dim corners. Selecting the appropriate scale, frame profile, and mounting position can visually double the perceived width of a narrow bath.
One of the most effective techniques is the wall-to-wall floating vanity mirror. Rather than hanging a small, framed oval mirror over the sink, installing a custom-cut, frameless mirror that spans the entire width of the vanity wall from the countertop or splash rail up to the ceiling immediately dissolves the back wall of the room. The seamless glass edge meets adjacent side walls and ceiling planes, creating a continuous optical horizon that tricks the brain into perceiving an adjoining identical room. Polished flat edges and concealed J-channel mounting brackets ensure a sleek, distraction-free installation.
Smart LED-backlit mirrors introduce both depth and ambient warmth. By incorporating an integrated perimeter lighting band set within frosted glass or concealed behind the mirror frame, the mirror appears to hover weightlessly off the drywall surface. This gentle halo effect washes the surrounding tile in a soft, shadowless glow that eliminates the harsh downward facial shadows commonly produced by traditional overhead vanity bar lights. Many modern smart mirrors also incorporate built-in defogging heating pads, integrated digital time displays, and adjustable color temperature controls ranging from warm candle-like 2700K to crisp daylight 4000K.
Complementing large mirrors with high-gloss and reflective architectural finishes reinforces the luminous quality of the space. Glazed ceramic tiles, polished marble mosaic accents, metallic fixture hardware in brushed brass or polished nickel, and semi-gloss ceiling paint finishes bounce light particles across every plane. However, designers must balance high-gloss elements with tactile matte textures, such as honed limestone floors or warm wood grain cabinetry, to prevent sterile glare and maintain rich sensory depth.
Layered Lighting Schemas: Ambient, Task, and Accent Illumination
Lighting in a compact bathroom is all too often treated as an afterthought, relegated to a single flush-mount ceiling fixture or a solitary bar light mounted directly above the mirror. This single-source illumination approach creates deep facial shadows, dark corner recesses, and an uninviting institutional ambiance. Modern bathroom design demands a sophisticated three-layer lighting scheme that balances ambient, task, and accent illumination to create warmth, functionality, and architectural drama.
Task illumination is critical around the grooming and vanity station. The optimal position for vanity task lighting is at eye level on either side of the mirror, spaced approximately twenty-eight to thirty-six inches apart and mounted sixty to sixty-six inches above the finished floor. Sconces mounted in this lateral orientation illuminate both sides of the face evenly, eliminating the unflattering hollows under the eyes, nose, and chin caused by downlighting. Fixtures should feature diffuse opal glass or frosted acrylic shades that soften high-output LED emitters. Specifying bulbs with a high Color Rendering Index of ninety or above ensures that skin tones, cosmetics, and fabrics appear completely natural.
Ambient illumination establishes the baseline general light level across the entire room. Recessed LED pot lights equipped with wide-beam flood lenses provide unobtrusive, glare-free overhead illumination. In compact bathrooms, two to four strategically placed two-inch or three-inch micro-aperture recessed lights provide ample ambient coverage without cluttering the ceiling plane with bulky fixtures. Recessed shower fixtures must carry certified wet-location ratings, featuring sealed vapor-tight trim rings and corrosion-resistant powder-coated aluminum construction to withstand prolonged exposure to hot steam.
Accent illumination provides the magical finishing touch that transforms a functional bath into a five-star residential retreat. Incorporating waterproof micro-LED channel strips beneath the floating vanity, inside recessed wall niches, or within a perimeter ceiling cove creates floating architectural planes and focal points of interest. Connecting all three lighting layers to independent smart dimmers and scene-based wall controllers enables homeowners to effortlessly transition from bright, invigorating morning grooming routines to tranquil, low-lux evening soaking sessions.
Tile Scale, Pattern Selection, and Continuous Floor-to-Ceiling Finishes
The choice of tile scale, color value, and layout pattern wields immense influence over how spacious a small bathroom feels. A common misconception among homeowners is that small bathrooms require small mosaic tiles. In reality, covering large wall expanses with tiny mosaic tiles produces hundreds of dark, intersecting grout lines, creating a visual grid that can make a tight space feel chaotic and busy. Employing large-format tiles measuring twelve by twenty-four inches, twenty-four by twenty-four inches, or even larger slab porcelain reduces grout line frequency dramatically, resulting in smooth, continuous surfaces that expand the room.
Tile layout patterns must be oriented deliberately to manipulate room proportions. In a narrow bathroom with high ceilings, laying rectangular tiles horizontally across the walls elongates the horizontal plane, making narrow walls appear significantly wider. Conversely, in a space with low ceilings, orienting rectangular tiles vertically draws the eye toward the ceiling, creating an illusion of loftiness. For dynamic visual interest without clutter, classic subway tiles laid in a vertical stacked bond or an elegant herringbone pattern inject tailored craftsmanship while preserving modern architectural simplicity.
Extending wall tiles continuously from the finished floor directly to the ceiling plane eliminates harsh visual boundaries. When wall tile stops abruptly midway up the wall, the contrasting paint line cuts the room into horizontal segments, foreshortening the vertical dimension. Running porcelain, ceramic, or natural stone tile all the way to the ceiling unifies the entire vertical envelope. Matching the grout color closely to the dominant tile body tone further minimizes grid contrast, allowing the surface to read as an organic, monomaterial plane.
Floor tile selection must balance safety, cleanability, and spatial continuity. As explored in curbless shower design, carrying the identical large-format floor tile from the dry room into the wet shower area creates a cohesive ground plane. To ensure slip resistance in wet zones without sacrificing large-format beauty, choose rectified porcelain tiles with a textured matte finish and a Dynamic Coefficient of Friction rating of 0.42 or higher, as recommended by the Tile Council of North America. Alternatively, precise linear envelope cuts around a trench drain allow large tiles to slope gracefully toward drainage points.
Color Palettes and Material Harmony: Monochromatic and Organic Tones
Color psychology and material textures profoundly shape the emotional ambiance and perceived volume of compact residential interiors. High-contrast color schemes, such as pairing stark black walls with pure white cabinetry, create stark spatial boundaries that emphasize room limits. In contrast, monochromatic and tonal color palettes utilizing warm neutrals, soft mineral greys, warm alabasters, and muted earth tones soften corners and blur wall intersections, allowing the boundaries of the room to gently recede.
A tonal white and off-white palette remains a timeless staple of small-space design, but it must be executed with nuance to avoid an uninviting clinical atmosphere. Rather than relying on stark, hospital-grade cool whites, contemporary designers layer complex undertones such as chalk white, creamy linen, warm travertine, and pale greige. Integrating diverse surface sheens, such as pairing a matte plaster wall finish with glossy glazed subway tiles and a satin-finished stone countertop, introduces rich textural complexity that keeps single-hue rooms vibrant and tactile.
Incorporating organic wood elements brings essential grounding warmth to modern bathrooms. Natural white oak, rich walnut, or thermally modified ash floating vanities introduce authentic organic grain patterns that counteract the coolness of glass, tile, and polished porcelain. When selecting natural wood elements for small bathrooms, ensure the millwork is sealed with marine-grade polyurethane or commercial catalyzed lacquer to protect the grain from high humidity and steam cycles.
Hardware and metal fixture finishes should be curated with restraint. In small spaces, mixing too many metallic finishes can create visual clutter. Limiting hardware to one primary finish, such as matte black, brushed champagne bronze, or polished nickel, with at most one complementary secondary accent creates a refined, tailored aesthetic. Unlacquered brass and brushed nickel finishes age gracefully, developing an authentic patina that adds bespoke personality to compact, modern spaces.
Compact Sanitary Fixtures: Wall-Hung Toilets and Low-Profile Sinks
The engineering of sanitary plumbing fixtures has advanced dramatically, giving renovators an array of ultra-compact, high-performance fixtures designed specifically for small residential footprints. Upgrading to specialized fixtures allows homeowners to save precious floor area while upgrading water efficiency and hygienic convenience.
The wall-hung in-wall carrier toilet represents the pinnacle of compact sanitary design. By housing the steel mounting frame and insulated dual-flush water tank inside the wall cavity behind the drywall, the toilet bowl projects just nineteen to twenty-two inches into the room, compared to twenty-eight to thirty inches for a standard two-piece floor-mounted toilet. In a tight water closet, recovering eight to ten inches of legroom can be the difference between a cramped knee-knocker layout and a spacious, comfortable passage. Furthermore, elevating the entire toilet fixture off the floor makes sweeping and mopping effortless, eliminating the hard-to-clean crevices found around traditional toilet bases.
Modern low-profile washbasins and trough sinks also offer substantial space savings without sacrificing washing comfort. Vessel sinks with ultra-thin ceramic edges, semi-recessed basins that project slightly beyond shallow thirteen-inch vanity bases, and wall-mounted cloakroom sinks with integrated towel bars offer practical handwashing functionality in extremely narrow powder rooms. Selecting a wall-mounted faucet instead of a deck-mounted faucet frees up three to four inches of rear countertop depth, allowing for a slimmer vanity cabinet while keeping the countertop clear and easy to wipe down.
Compact luxury also extends to smart bidet integration. Modern intelligent toilets and slim electronic bidet seats combine warm water cleansing, heated seating, warm air dryers, and automatic deodorization into a single streamlined silhouette. These multi-functional fixtures eliminate the need for standalone bidet basins and bulky toilet paper storage baskets, aligning perfectly with the minimalist ethos of high-performance small bathroom design.
Advanced Ventilation Mechanics and Moisture Mitigation Engineering
In a small bathroom, steam and airborne moisture accumulate rapidly during hot showers. Without adequate mechanical ventilation, this trapped humidity condenses on cool mirrors, penetrates drywall seams, and fosters mold, mildew, and peeling paint finishes. A successful small bathroom remodel must treat ventilation engineering as a paramount structural priority, preserving air quality and protecting high-end finish investments.
Sizing a bathroom exhaust fan requires calculating both room volume and ducting resistance. Standard building codes mandate a minimum ventilation capacity of fifty Cubic Feet per Minute (CFM) for bathrooms up to fifty square feet. For larger or heavily utilized compact bathrooms, designers recommend sizing the fan to provide at least one CFM per square foot of floor area, plus additional capacity if installing deep soaking tubs or high-volume rainfall showerheads. High-efficiency fans featuring whisper-quiet electronically commutated motors operate at sound ratings below 0.5 sones, ensuring that proper ventilation can run without creating disruptive acoustic roar.
Ductwork installation practices directly govern real-world exhaust performance. Exhaust fans should be vented outdoors using rigid, smooth-walled galvanized metal ducting rather than cheap, corrugated flexible foil tubing, which creates significant airflow turbulence and traps moisture pockets. Ducts must terminate through an exterior wall or roof cap equipped with a gravity backdraft damper, sloping gently downward toward the exterior termination point to prevent condensed droplets from draining back into the fan housing.
Smart humidity-sensing wall switches elevate bathroom ventilation from manual guesswork to automated moisture defense. Modern sensors continuously monitor ambient relative humidity and air temperature, automatically activating the exhaust fan when a rapid rise in humidity is detected. The fan continues running for a designated drying cycle after the shower has ceased, shutting off only when humidity levels normalize. Integrating continuous low-speed background ventilation modes further ensures constant fresh air exchange, meeting the indoor air quality standards set by the American Society of Heating, Refrigerating and Air-Conditioning Engineers.
Waterproofing Membrane Systems and Substrate Integrity Engineering
Behind the gleaming surface of designer tiles and polished quartz counters lies the most critical defensive layer of any small bathroom renovation: the sub-tile waterproofing envelope. In high-humidity environments, tile and grout assemblies are water-resistant, not waterproof. Porous cementitious grout joints inevitably allow microscopic moisture vapor to penetrate into the substrate. Without an unyielding continuous waterproofing barrier, trapped moisture seeps into structural timber framing, causing rot, mold spores, and costly subfloor degradation.
Modern wet-area substrate standards mandate the complete rejection of traditional drywall or standard greenboard behind shower walls. Instead, renovators must install certified cement backer boards or lightweight extruded polystyrene foam panels. Sheet waterproofing membranes, composed of high-strength bonded polyethylene fleece, offer unmatched crack-isolation performance and vapor retardance across entire wet rooms. Liquid-applied elastomeric waterproofing compounds provide an equally dependable alternative for complex shapes, applied in two cross-hatched coats with embedded reinforcement fabric at all internal ninety-degree corners, plumbing penetrations, and change-of-plane transitions.
Testing the integrity of the waterproofing installation prior to tiling is a non-negotiable quality control phase known as the flood test. In a curbless shower build, contractors install an inflatable mechanical test plug inside the drain pipe and fill the shower pan basin with water up to the perimeter threshold line, maintaining the water level for a continuous twenty-four-hour observation period. Documenting zero water loss confirms that every corner lap, membrane weld, and drain clamping collar is completely impermeable before costly custom tiles are permanently bonded.
Thermostatic Mixing Valves and Precision Plumbing Mechanics
Compact bathrooms require intelligent plumbing manifold engineering to deliver uncompromising luxury within tight utility chases. Standard pressure-balance shower valves frequently suffer from sudden temperature fluctuations when adjacent plumbing fixtures, such as washing machines or kitchen dishwashers, draw cold water supply. Upgrading to a thermostatic mixing valve introduces an internal wax paraffin element that dynamically monitors and maintains water temperature within one degree Fahrenheit of the user preference, preventing accidental scalding and delivering an exceptional showering experience.
Concealed in-wall valve systems represent an ideal space-saving choice for micro-showers. By housing the rough-in plumbing brass valve body deep inside the wall cavity, only sleek, low-profile control dials project from the tile face, saving valuable elbow room inside narrow shower stalls. Equipping the shower system with an integrated dual-function diverter allows effortless toggling between an overhead rainfall showerhead and a versatile handheld wand on an adjustable slide bar, facilitating easy shower stall cleaning, pet bathing, and personalized grooming.
Comparative Diagnostic Matrix of Small Bathroom Vanity Styles
Selecting the ideal vanity style is one of the most critical structural and financial decisions in a small bathroom remodel. The vanity dictates not only the storage volume and countertop surface available for daily grooming routines, but also the structural framing modifications, rough-in plumbing relocations, and visual footprint within the room. Homeowners must balance their storage requirements with their desire for open, unobstructed floor area.
To assist renovators in weighing the trade-offs between competing vanity configurations, the following matrix compares the four primary vanity types across critical design, structural, and ergonomic metrics. Review these comparative parameters carefully before committing to cabinet millwork and rough-in plumbing specifications.
| Vanity Style | Visual Footprint | Storage Volume | Plumbing Rough-In Needs | Structural Framing Demands | Ideal Application |
|---|---|---|---|---|---|
| Floating Wall-Hung | Ultra-Light (Open Floor) | Moderate (Full-Extension Drawers) | In-Wall Drain & Supplies Essential | Heavy 2×8 Structural Stud Blocking | Primary Small Baths Seeking Open Space |
| Freestanding Legged | Light Furniture Aesthetic | Moderate-High (Lower Shelf/Drawers) | Standard Wall or Floor Connections | Standard Stud Anchoring | Vintage or Transitional Bathroom Remodels |
| Pedestal Washbasin | Minimalist (Maximum Open Area) | Zero Built-In Storage | Standard Vertical Wall Drain | Basic Wall Stud Fastening | Guest Powder Rooms & Narrow Half-Baths |
| Corner Basin Vanity | Compact (Utilizes Dead Corners) | Low-Moderate (Angular Cabinet) | Custom Corner Branch Line Rough-In | Dual-Wall Stud Blocking | Ultra-Tight Attic or Basement Micro-Baths |
As clearly demonstrated by this comparison, floating wall-hung vanities offer the optimal balance of visual airiness and usable internal organization, provided the renovation budget accounts for horizontal wall blocking and in-wall drain rough-ins. For powder rooms where storage is secondary, pedestal or console washbasins maximize open square footage. Carefully consider your daily grooming habits and storage inventories before making a final commitment.
Frequently Asked Questions About Small Bathroom Remodeling
What is the minimum recommended size for a full three-piece bathroom?
The standard minimum dimension for a full three-piece bathroom containing a sink, toilet, and walk-in shower or tub is five feet by eight feet, translating to forty square feet. In specialized architectural renovations, an efficient three-piece bath can be configured within thirty to thirty-five square feet using a thirty-by-thirty-inch corner shower, a wall-hung toilet, and a shallow twenty-inch floating vanity, provided all plumbing and door clearances adhere strictly to local residential building codes.
Can a walk-in shower make a small bathroom look bigger than a tub?
Yes, replacing a traditional bathtub with a curbless walk-in shower enclosed in clear frameless glass makes a small bathroom appear substantially larger. A solid tub apron acts as a visual wall that abruptly cuts the bathroom floor plan in half. A walk-in shower allows the eye to travel across the entire continuous floor tile and back wall, instantly expanding the visual horizon and enhancing the perceived depth of the room.
How much does it cost to remodel a small bathroom with modern features?
On average, remodeling a compact full bathroom ranges from eight thousand to twenty-five thousand dollars depending on structural alterations, finish materials, and geographic labor rates. A mid-range cosmetic remodel replacing fixtures, vanity, and tile within existing plumbing lines typically costs between ten thousand and fifteen thousand dollars, while high-end architectural overhauls involving curbless showers, wall-hung toilets, and custom recessed millwork can exceed twenty thousand dollars.
Are large format tiles really suitable for very small bathrooms?
Yes, large format tiles such as twelve-by-twenty-four-inch or twenty-four-by-twenty-four-inch porcelain tiles are exceptionally well-suited for small bathrooms. By minimizing the number of grout joints, large format tiles create smooth, uninterrupted planes that trick the brain into seeing a larger room. Small mosaic tiles produce a busy grid of grout lines that can visually compress a compact space and require significantly more maintenance.
How do I handle ventilation in a small bathroom without an exterior window?
In windowless bathrooms, installing an efficient mechanical exhaust fan rated at fifty to eighty CFM is essential to prevent moisture damage, mildew growth, and poor indoor air quality. The fan must vent directly to the outdoors through an exterior wall or roof cap using smooth-walled rigid ductwork. Installing a smart wall-mounted humidity sensor ensures the fan activates automatically during showers and runs until the space is completely dry.
What is the best lighting color temperature for small bathrooms?
The ideal color temperature for bathroom lighting is between 2700K (warm white) and 3000K (soft neutral white). Lights in this temperature range provide a welcoming, flattering glow that accurately highlights natural skin tones without the harsh, blue-tinted clinical glare of 5000K daylight bulbs. For optimal results, ensure all LED fixtures have a Color Rendering Index rating of ninety or higher.
Is a pocket door worth the extra cost in a bathroom renovation?
Installing a pocket door is one of the highest-yield spatial upgrades in a small bathroom. A standard swinging door requires approximately nine square feet of open swing clearance that cannot be blocked by cabinetry, toilets, or towel bars. A pocket door slides effortlessly into the wall framing, reclaiming that entire footprint for easier movement, wider vanity widths, or expanded shower entries.
What colors make a small bathroom look most spacious?
Monochromatic, low-contrast color palettes make small bathrooms feel most spacious. Soft warm whites, pale greiges, gentle oatmeals, and muted sage tones allow walls to blend together and reflect light effectively into shadowy corners. Rather than relying on contrasting paint colors, introduce visual interest through rich textural variations such as fluted wood vanities, textured matte tiles, and warm brushed metal hardware.
How can I add storage without cluttering my small bathroom?
The most effective strategy for uncluttered storage is recessed carpentry. Building storage niches between the existing two-by-four wall studs allows you to create recessed shower shelves, flush medicine cabinets, and over-toilet linen pantries that sit completely inside the wall plane. This provides deep storage capacity for daily grooming products without encroaching an inch onto valuable floor or counter space.
Concluding Blueprint for a Successful Small Bathroom Transformation
Remodeling a small bathroom requires deliberate planning, architectural discipline, and an uncompromising commitment to spatial efficiency. Rather than viewing tight square footage as an insurmountable handicap, treating the compact footprint as an opportunity for thoughtful design often yields some of the most cohesive, jewel-box spaces in residential architecture. When every fixture, tile transition, and illumination beam is intentionally calibrated, a modest bathroom can rival the comfort, functionality, and aesthetic tranquility of a spacious luxury spa.
Begin your renovation journey by conducting a rigorous audit of your physical dimensions, daily grooming workflows, and storage requirements. Prioritize structural enhancements that physically and visually open the space: eliminate swinging door radiuses with pocket systems, float vanities above an unbroken tile floor, invest in continuous curbless shower pans, and recess storage cavities directly into wall framing. These foundational interventions establish an expansive, clutter-free canvas upon which refined finishes, layered lighting, and tactile organic materials can truly shine.
Finally, never compromise on the unseen infrastructure that guarantees long-term durability and peace of mind. Robust waterproofing membranes, solid structural framing blocking, precision plumbing rough-ins, and high-performance quiet ventilation systems protect your investment against moisture intrusion and daily wear for decades to come. By honoring the principles of spatial ergonomics, optical horizon expansion, and meticulous craftsmanship detailed in this guide, your small bathroom transformation will deliver enduring comfort, elevated daily rituals, and timeless residential value.